by ravindra
This project creates a web-based chatbot that lets users ask questions in plain English (e.g., “Show me the top 5 customers by revenue”), converts them to SQL queries using LLaMA 2 (via Ollama), executes them on a MySQL database, and displays the results in a table. It’s designed for beginners, with step-by-step setup and simple code.
📋 Project Structure
nl-sql-chatbot/
├── backend/
│   ├── main.py              # FastAPI backend
│   ├── database.py          # MySQL connection and queries
│   ├── llm.py               # Ollama (LLaMA 2) integration
│   └── requirements.txt     # Python dependencies
├── frontend/
│   ├── index.html           # Main webpage
│   ├── styles.css           # Basic styling
│   └── script.js            # JavaScript for frontend logic
├── sql/
│   └── init.sql            # MySQL database setup
└── README.md               # Setup instructions
🛠️ Setup Instructions
Prerequisites
- Python 3.9+: Download and install from python.org.
- MySQL: Install MySQL Community Server (mysql.com).
- Ollama: Install Ollama to run LLaMA 2 locally (ollama.ai).
- Git: Optional, for cloning the project.
- A code editor like VS Code.
Step 1: Set Up the Environment
- Clone or create the project folder:
mkdir nl-sql-chatbot cd nl-sql-chatbot - Create a virtual environment:
python -m venv venv source venv/bin/activate # On Windows: venv\Scripts\activate - Install Python dependencies: Create backend/requirements.txt with:
fastapi==0.115.0 uvicorn==0.30.6 mysql-connector-python==9.0.0 requests==2.32.3Then run:pip install -r backend/requirements.txt
Step 2: Set Up MySQL
- Start MySQL and create a database:
mysql -u root -p CREATE DATABASE company_db; - Create tables and sample data by running sql/init.sql (see below).
- Update backend/database.py with your MySQL credentials (e.g., user, password).
Step 3: Set Up Ollama
- Install Ollama: Follow instructions at ollama.ai.
- Pull and run LLaMA 2:
ollama pull llama2 ollama run llama2 - Ensure Ollama is running at http://localhost:11434.
Step 4: Run the Project
- Start the FastAPI backend:
cd backend uvicorn main:app --reload - Open frontend/index.html in a browser (e.g., via VS Code’s Live Server or by double-clicking the file).
📂 Code Files
1. MySQL Setup (sql/init.sql)
This creates a sample database with customers and orders tables.
USE company_db;
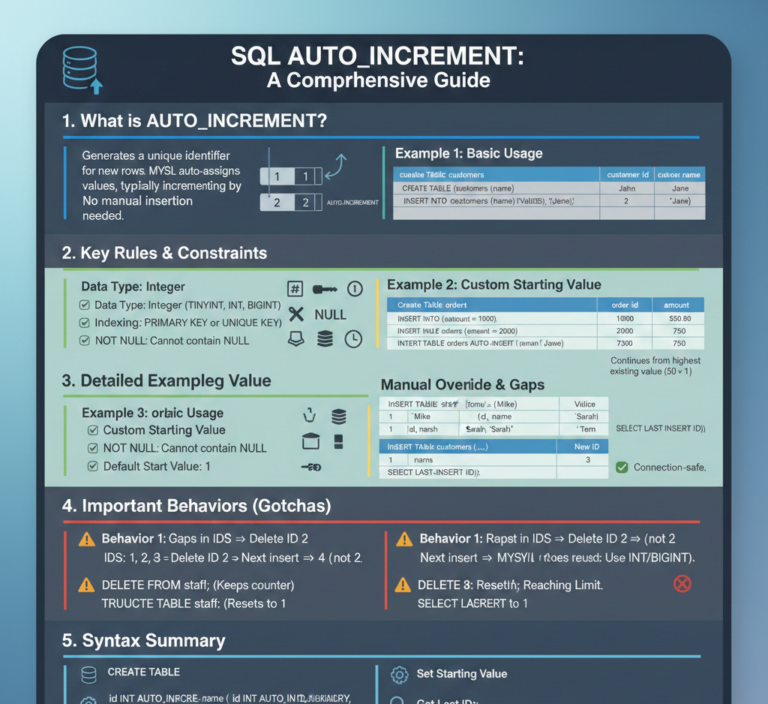
CREATE TABLE customers (
customer_id INT PRIMARY KEY AUTO_INCREMENT,
name VARCHAR(100),
email VARCHAR(100)
);
CREATE TABLE orders (
order_id INT PRIMARY KEY AUTO_INCREMENT,
customer_id INT,
order_date DATE,
revenue DECIMAL(10, 2),
FOREIGN KEY (customer_id) REFERENCES customers(customer_id)
);
INSERT INTO customers (name, email) VALUES
('John Doe', 'john@example.com'),
('Jane Smith', 'jane@example.com'),
('Acme Corp', 'acme@example.com');
INSERT INTO orders (customer_id, order_date, revenue) VALUES
(1, '2023-10-01', 500.00),
(1, '2023-10-15', 300.00),
(2, '2023-10-05', 700.00),
(3, '2023-10-20', 1200.00);Run this in MySQL:
mysql -u root -p company_db < sql/init.sql2. Backend: FastAPI (backend/main.py)
This handles API requests, connects to Ollama, and executes SQL queries.
from fastapi import FastAPI, HTTPException
from fastapi.middleware.cors import CORSMiddleware
from pydantic import BaseModel
from database import execute_query
from llm import generate_sql_query
import re

app = FastAPI()

# Allow CORS for frontend
app.add_middleware(
    CORSMiddleware,
    allow_origins=["*"],
    allow_credentials=True,
    allow_methods=["*"],
    allow_headers=["*"],
)

class QueryRequest(BaseModel):
    question: str

# Basic SQL injection prevention
def is_safe_query(query: str) -> bool:
    dangerous_keywords = ['drop', 'delete', 'update', 'insert', 'truncate']
    query_lower = query.lower()
    return not any(keyword in query_lower for keyword in dangerous_keywords)

@app.post("/query")
async def process_query(request: QueryRequest):
    try:
        # Step 1: Generate SQL query using LLaMA 2
        sql_query = generate_sql_query(request.question)

        # Step 2: Validate SQL query
        if not is_safe_query(sql_query):
            raise HTTPException(status_code=400, detail="Unsafe SQL query detected")

        # Step 3: Execute query
        results, columns = execute_query(sql_query)

        return {
            "sql_query": sql_query,
            "results": results,
            "columns": columns
        }
    except Exception as e:
        raise HTTPException(status_code=500, detail=str(e))
3. Backend: Database Connection (backend/database.py)
Handles MySQL connections and query execution.
import mysql.connector
from mysql.connector import Error

def get_db_connection():
    return mysql.connector.connect(
        host="localhost",
        user="root",  # Replace with your MySQL user
        password="",  # Replace with your MySQL password
        database="company_db"
    )

def execute_query(query: str):
    try:
        conn = get_db_connection()
        cursor = conn.cursor()
        cursor.execute(query)
        results = cursor.fetchall()
        columns = [desc[0] for desc in cursor.description]
        cursor.close()
        conn.close()
        return results, columns
    except Error as e:
        raise Exception(f"Database error: {str(e)}")
4. Backend: Ollama Integration (backend/llm.py)
Sends prompts to Ollama to generate SQL queries.
import requests

def generate_sql_query(question: str) -> str:
    prompt = f"""
    You are a MySQL expert. Translate the following natural language query into a valid MySQL query for a database with 'customers' (customer_id, name, email) and 'orders' (order_id, customer_id, order_date, revenue) tables. Return only the SQL query, no explanations.

    Question: {question}
    """
    response = requests.post("http://localhost:11434/api/generate", json={
        "model": "llama2",
        "prompt": prompt,
        "stream": False
    })
    if response.status_code == 200:
        return response.json()['response'].strip()
    else:
        raise Exception("Failed to generate SQL query")
5. Frontend: HTML (frontend/index.html)
A simple webpage for entering queries and displaying results.
<!DOCTYPE html>
<html lang="en">
<head>
    <meta charset="UTF-8">
    <meta name="viewport" content="width=device-width, initial-scale=1.0">
    <title>AI SQL Chatbot</title>
    <link rel="stylesheet" href="styles.css">
</head>
<body>
    <div class="container">
        <h1>AI SQL Chatbot</h1>
        <p>Ask questions like "Show top 5 customers by revenue" or "List orders after 2023-10-10".</p>
        <input type="text" id="queryInput" placeholder="Enter your question...">
        <button onclick="sendQuery()">Submit</button>
        <div id="sqlOutput"></div>
        <table id="resultsTable">
            <thead id="tableHead"></thead>
            <tbody id="tableBody"></tbody>
        </table>
    </div>
    <script src="script.js"></script>
</body>
</html>
6. Frontend: CSS (frontend/styles.css)
Basic styling for the webpage.
body {
    font-family: Arial, sans-serif;
    margin: 0;
    padding: 20px;
    background-color: #f4f4f4;
}

.container {
    max-width: 800px;
    margin: 0 auto;
    background: white;
    padding: 20px;
    border-radius: 8px;
    box-shadow: 0 0 10px rgba(0,0,0,0.1);
}

h1 {
    text-align: center;
    color: #333;
}

input {
    width: 70%;
    padding: 10px;
    margin: 10px 0;
    border: 1px solid #ccc;
    border-radius: 4px;
}

button {
    padding: 10px 20px;
    background-color: #28a745;
    color: white;
    border: none;
    border-radius: 4px;
    cursor: pointer;
}

button:hover {
    background-color: #218838;
}

table {
    width: 100%;
    border-collapse: collapse;
    margin-top: 20px;
}

th, td {
    padding: 10px;
    border: 1px solid #ddd;
    text-align: left;
}

th {
    background-color: #f2f2f2;
}

#sqlOutput {
    margin-top: 20px;
    padding: 10px;
    background-color: #e9ecef;
    border-radius: 4px;
}
7. Frontend: JavaScript (frontend/script.js)
Handles user input and displays results.
async function sendQuery() {
    const queryInput = document.getElementById('queryInput').value;
    if (!queryInput) {
        alert('Please enter a question');
        return;
    }

    try {
        const response = await fetch('http://localhost:8000/query', {
            method: 'POST',
            headers: { 'Content-Type': 'application/json' },
            body: JSON.stringify({ question: queryInput })
        });
        const data = await response.json();

        // Display SQL query
        document.getElementById('sqlOutput').innerText = `Generated SQL: ${data.sql_query}`;

        // Display table headers
        const tableHead = document.getElementById('tableHead');
        tableHead.innerHTML = '';
        const headerRow = document.createElement('tr');
        data.columns.forEach(col => {
            const th = document.createElement('th');
            th.innerText = col;
            headerRow.appendChild(th);
        });
        tableHead.appendChild(headerRow);

        // Display table data
        const tableBody = document.getElementById('tableBody');
        tableBody.innerHTML = '';
        data.results.forEach(row => {
            const tr = document.createElement('tr');
            row.forEach(cell => {
                const td = document.createElement('td');
                td.innerText = cell;
                tr.appendChild(td);
            });
            tableBody.appendChild(tr);
        });
    } catch (error) {
        alert('Error: ' + error.message);
    }
}
8. README (README.md)
Instructions for running the project.
# AI SQL Chatbot

A web app that converts natural language questions into SQL queries using LLaMA 2 (Ollama) and executes them on a MySQL database.

## Setup

1. **Install prerequisites**:
   - Python 3.9+: [python.org](https://www.python.org/downloads/)
   - MySQL: [mysql.com](https://dev.mysql.com/downloads/)
   - Ollama: [ollama.ai](https://ollama.ai/)

2. **Clone or set up the project**:
   ```bash
   mkdir nl-sql-chatbot
cd nl-sql-chatbot- Set up Python environment:
python -m venv venv source venv/bin/activate # On Windows: venv\Scripts\activate pip install -r backend/requirements.txt - Set up MySQL:
- Create database: CREATE DATABASE company_db;
- Run sql/init.sql in MySQL.
- Update backend/database.py with your MySQL credentials.
- Set up Ollama:
ollama pull llama2 ollama run llama2 - Run the backend:
cd backend uvicorn main:app --reload - Run the frontend: Open frontend/index.html in a browser (use VS Code Live Server or double-click).
Example Queries
- “Show all customers”
- “List orders with revenue over 500”
- “Show top 5 customers by revenue”
Notes
- Ensure Ollama is running at http://localhost:11434.
- The app includes basic SQL injection prevention.
- Results are displayed in a table with the generated SQL query shown above.
---

## 🚀 How to Use
1. Open the webpage (`frontend/index.html`).
2. Type a question like "Show all orders with revenue over 500" or "List customers with name John Doe".
3. Click "Submit".
4. See the generated SQL query and results in a table.

---